

How to Create a New Word Set
With our “Add/Edit a Word Set” tool, all you need to do is prepare your images and vocabulary and you can create your Word Set in the same style as our website. This tutorial should take you around 20 minutes to complete.
Before your start – Registration
If you have already registered an account with us, please log in directly and go to Tutorial - Start (below).
If you haven’t registered yet, click “Register” at the lower-right hand corner of the main screen. A registration form will appear. Fill in your username and email and then click “Create new account”. Your username will appear with each Word Set that you author.
Once you have created your account, you will receive an automatic confirmation email which contains a link to the page where you can set your password. You will need to log in within 24 hours of receiving the email by clicking on the link or copying and pasting it into your browser. After setting your password, you will be able to login from now on with your username and password.
(If you don’t receive a confirmation email, check your spam folder. If you still can’t find it, please send us an email, and we will help to re-set the account for you.)
Tutorial - Start
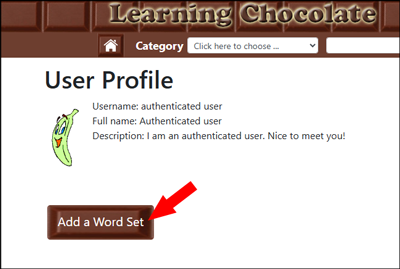
Click on the “Login” button located in the lower-right corner of the main webpage. Once you’ve logged in, you’ll see a new button labeled “Add a Word Set” in the center of the page. Click this button to be taken directly to the “Add/Edit a Word Set” tool page.
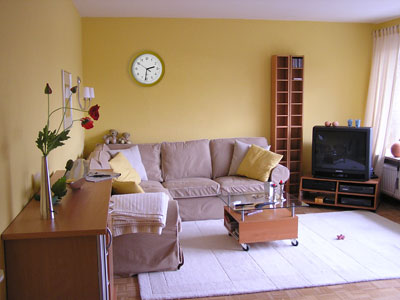
The image in Figure 2 will be used for this tutorial. Please right click on it and choose “Save image as” to save on to your computer.
1. Language
You currently have 7 language options to select from. For this tutorial please choose “English US”.
2. Title
Please enter a short title that reflects the content of your Word Set. The site format uses upper case letters for the first character of all key words. Enter “Living Room, tutorial” as the title of this Word Set.
3. Images
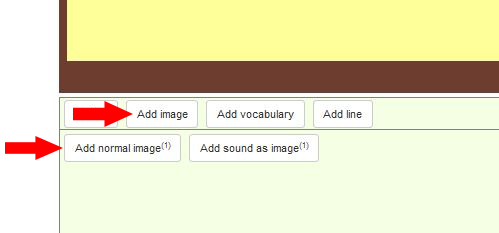
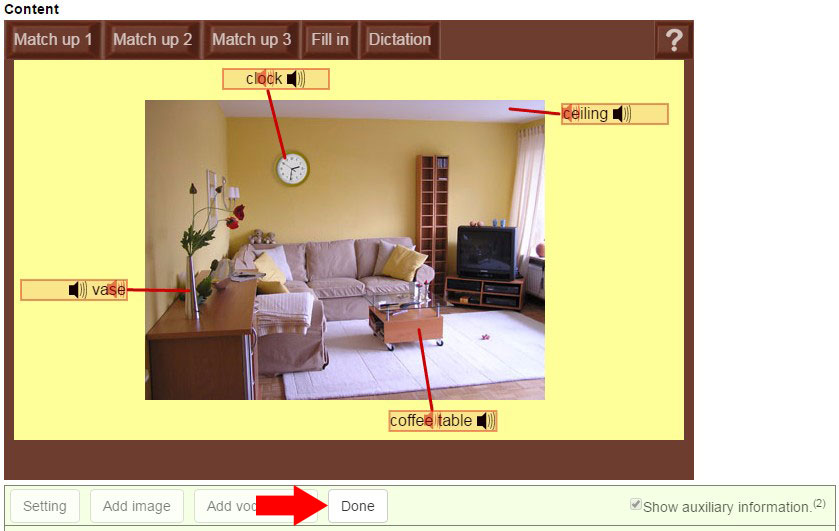
When completed, the editor message box will prompt "100% uploaded.” Once you have the image in the Content Screen, you can click on the image to move it to the position you choose. For this tutorial we want the image to be in the center of the yellow background (Figure 4).
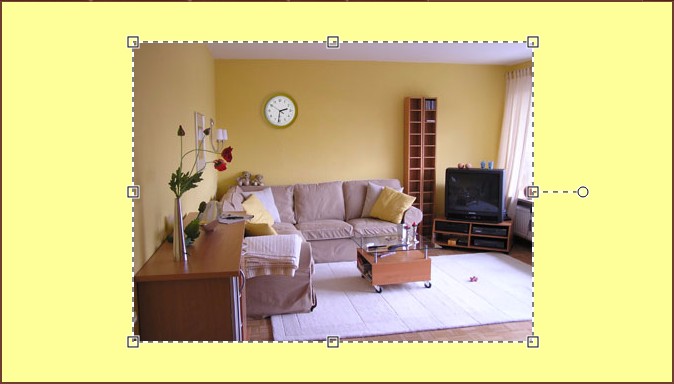
Note: After selecting the image, some basic image editing tools are available, such as moving, scaling, rotating, and skewing. To scale the image while maintaining the x-y ratio, press “Shift” and drag the box at the corner of the image. You can also check the “Constrain” ratio boxes at the bottom of the screen.
If you need to delete an image at any time, just click on the DELETE button.
4. Vocabulary
Now you can start to add your vocabulary. Click “Add Vocabulary” (Figure 5a) and “Vocabulary #1” will appear in the upper-left screen.
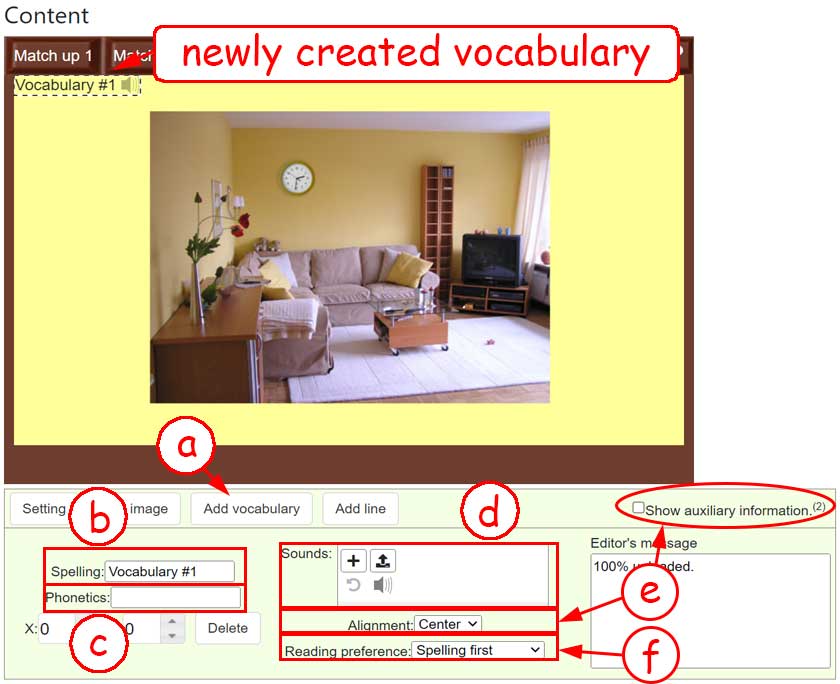
- Spelling: Go to the “Spelling” box (Figure 5b) and type in “ceiling” for your first vocabulary word.
- Phonetics: Some languages are quite difficult to learn without phonetics (e.g. Chinese & Japanese). For these languages, go to “Phonetics” box (Figure 5c). Since this Word Set is in English we just leave it blank.
- Sound: Go to “Sounds” box (Figure 5d). You will see there are some buttons for sound generation.
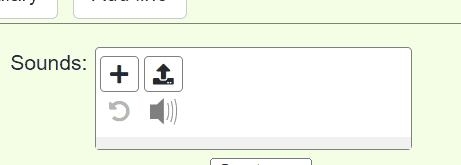
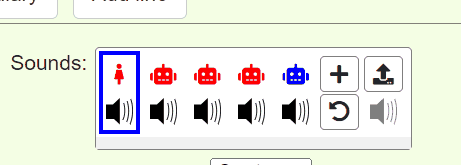
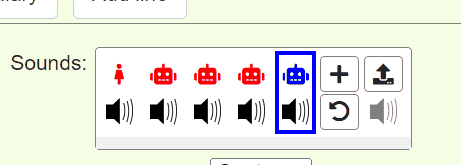


First, click the "Get Sounds" button (Figure 6a). Then, click each sound available and check which one is the best for you (Figure 6b). The last one you click on will be the sound you select. The system will provide you with 5 sounds at a time. If they are still not good enough, you can click "Get Sounds" once more to get another 5 more sounds (Figure 6c). In case you have changed the vocabulary, you can click the "Reset" button to clear the previous sounds (Figure 6d). If the sounds provided are all not satisfactory, you can upload your own sound. Click the "Upload" button to do so (Figure 6e).
- Alignment: Click the “Alignment” box (Figure 5e) and choose from 5 options: Center, Left, Top, Right, and Bottom. Let’s select “Left” for “ceiling".
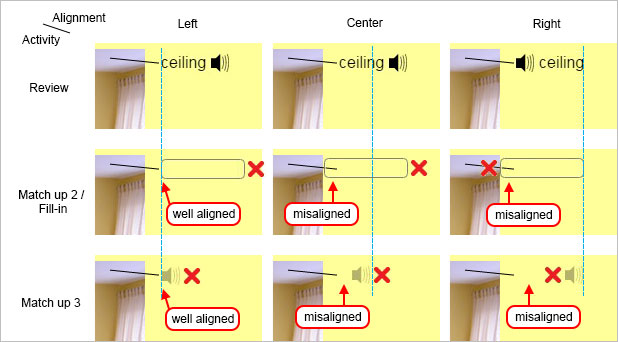
Figure 7 shows the effect of different alignments. The alignment here means an invisible line (the blue line shown) which the word aligns to in the different games. For example, for “ceiling”, if we set it as ‘left’ alignment, the word (Figure 7a), the fill-in box (Figure 7b), and the gray sound icon (Figure 7c) will all be aligned to the left for the Review, Match Up 2/Fill In, and Match Up 3 games.
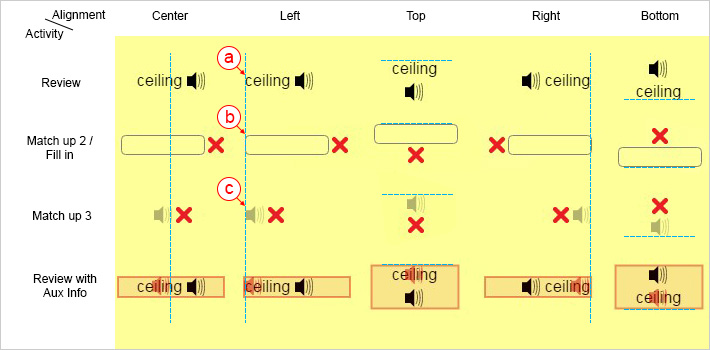
Sometimes, it is not easy to observe the effect of the alignment when editing. It is recommended to check the “show auxiliary information” box. If checked, a red box will appear, surrounding all the elements of a word (i.e. the box area which includes the spelling, sound icon, and fill-in box shown in the games, Match Up 2 and Fill In, as well as the check and cross marking after “Check Answers”). You will also be able to see a red sound icon which indicates the location of the gray sound icon in Match Up 3. This red sound icon is also an indication of the alignment. It is always located along the alignment line. “Review with Aux Info” in Figure 11 shows the effect if the “show auxiliary information” is checked.
Since the width of vocabulary, fill-in box and sound icon are different, correct alignment should be set so that they show up in a good location on the screen when users play ALL the games. Figure 8 shows the effect of different alignments.
- Reading preference: Now you need to choose your reading preference (go back to Figure 5f). Most of the words on this website are set to spelling first. However, if you prefer to hear the sound first, then show the spelling, you can select the sound button first (Figure 9).
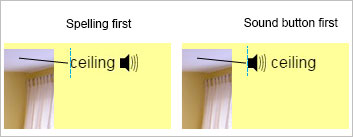
For this tutorial, we choose “Spelling first” for the word “ceiling”.
- Position: Click on the vocabulary “ceiling”. Move the cursor over the vocabulary and a cross arrow will appear next to the cursor. Press and hold, then drag the vocabulary to the right position shown in Figure 10, then release.
- Repeat the above steps to add other vocabulary according to the below table and move them to the position shown in Figure 10.
| Spelling | Phonetics | Sound | Alignment | Reading preference |
|---|---|---|---|---|
| ceiling | [blank] | Machine Michael | Left | Spelling first |
| clock | [blank] | Machine Michael | Center | Spelling first |
| coffee table | [blank] | Machine Michael | Center | Spelling first |
| vase | [blank] | Machine Michael | Right | Spelling first |
5. Indication lines
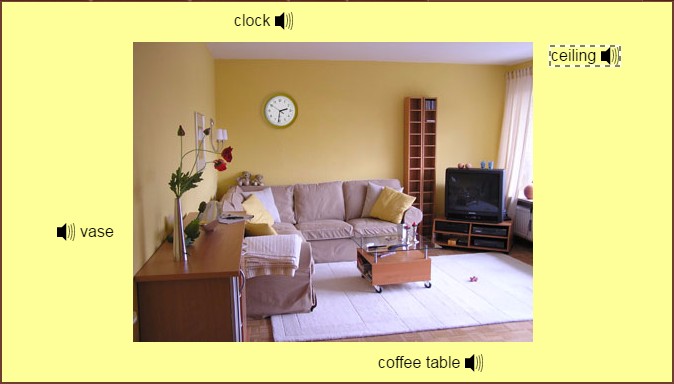
If the image includes more than one object, it is a good idea to add indication lines to make it clear which object is linked to which vocabulary word. For this tutorial, the image we used includes many objects so we are going to add some lines.
To add lines, check the “show auxiliary information” box and click “Add Line” (Figure 11) to start.
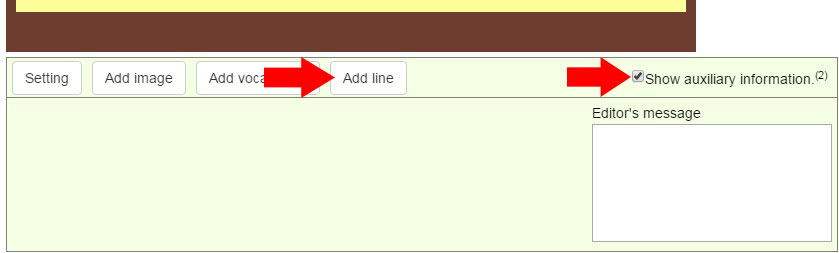
To draw the first line, press and hold a start point near to the red sound icon of vocabulary "ceiling": don’t release it! Move the cursor to the object of the ceiling. Once you have drawn the line, release. You can draw the other 3 lines in the same way as in Figure 12. When you have finished adding all the lines, click “Done”.
Note: Be aware that once you have clicked “Add Line” to start, it will continue to add single lines in a way of press->release->press->release->… until you click “Done”. If you want to edit or delete the line, click “Done” to exit first, then select the line to do so.
6. Appendix
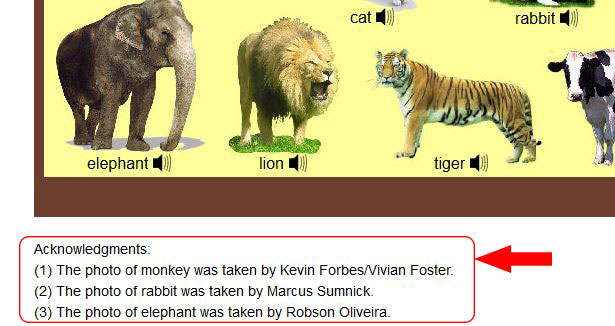
Use the Appendix to put any extra information you might have, such as a copyright statement, acknowledgment, or notice about an image used in the word set. Figure 13 gives you an example of how to show an acknowledgment.
For this tutorial, there is no extra information, so you just leave the Appendix blank.
7. Category
Each word set must be allocated a main category. This is determined by the content topic covered. For this tutorial please select “House”.
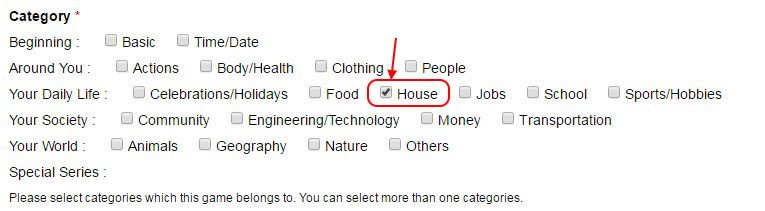
To help you choose when you come to do your own Word Sets, please review the categories and other Word Sets within each one. Then mark the category box you choose. Your category selection will be reviewed by the moderator before final publication to ensure consistency across the site.
Note: The category ‘Others’ can be used for your Word Set if you are unsure which category to allocate.
8. Thumbnail
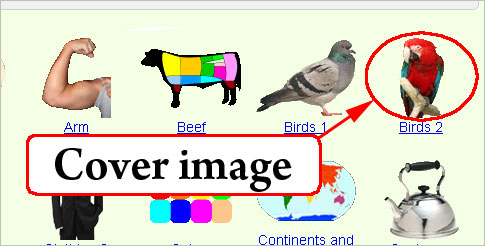
Thumbnail is an icon to represent your Word Set on the front page, as in Figure 15.
Click “Browse” and select the image you downloaded before (Figure 1). Click “Upload”, and the image will be automatically downsized to fit 100 x 80 pixels.
If you have several images in your Word Set, choose just one image for your thumbnail.
9. Status setting
All new Word Sets have to have a status setting: "Draft", "Unlisted", and "Submit to Review".
- "Draft": the Word Set can only be seen under the author's own Account page by the author. It is suitable for a Word Set that is still being edited but not yet finished.
- "Unlisted": the Word Set can be seen under the author's Account page by the author and others, or via the link. However, it will not be listed on the front page. It is suitable for a Word Set which is specially made for your class or to assist you with your teaching material but is not suitable to be read independently by the general public. Also, if you wish to keep the Word Set content unedited by us, it is recommended to set it as “Unlisted.”
- "Submit to Review": viewing options are similar to "Unlisted" but a notification will also be sent to the moderator to review before publication. You are welcome to contribute any Word Set for use by the general public and we believe any contribution has the potential to help children and students all around the world. If the topic already has many Word Sets and the contributed new Word Set is similar, we may choose to re-assign the status to “Unlisted”. We are very grateful for all contributions and, as stated above, the Word Set will remain available to the author and others via a specific link. However, we also have to maximize the range of the entire LC site, within our specific resources, and we must keep this in mind during the review stage. If we can accept, after review, edit, and the replacement of real human sounds, the moderator will publish this Word Set to general public.
Once a Word Set has been submitted to review, it is assumed you have agreed for us to edit the Word Set in order to comply with our quality assurance measures and to ensure consistency of style with our existing Word Sets on the Learning Chocolate site.
Since this is only a tutorial, please select “Draft”. For your formal Word Set, please select “Unlisted” or “Submit to Review”.
Note: The review process normally takes between 2-6 weeks. Once a Word Set has been made public, the author is still able to edit it if they wish.
10. Revision Log
The Revision Log message is for you to leave any comments or remarks about what you have done so as to let the site administrator or editors know. For this tutorial, we will leave it blank.
11. Save
You have now completed all the steps to create a Word Set.
Before saving it, check the spellings, try the pronunciations and play the games. In particular, play the Match-up Games 2 and 3 to see if the fill-in boxes or sound icons are displayed in good locations. If you find any bugs or have any further suggestions, please feel free to send us an email.
If you are happy with how everything looks, click the “Save” button.
Congratulations! You have finished this tutorial.
We hope you can now enjoy creating a Word Set by yourself and join us in making fun learning resources for everyone!
Further Information
Here are some useful image websites you may wish to use for your word set.